Tuesday, 11 September 2018

Keyboard prototypes have been manufactured, and they are AMAZING

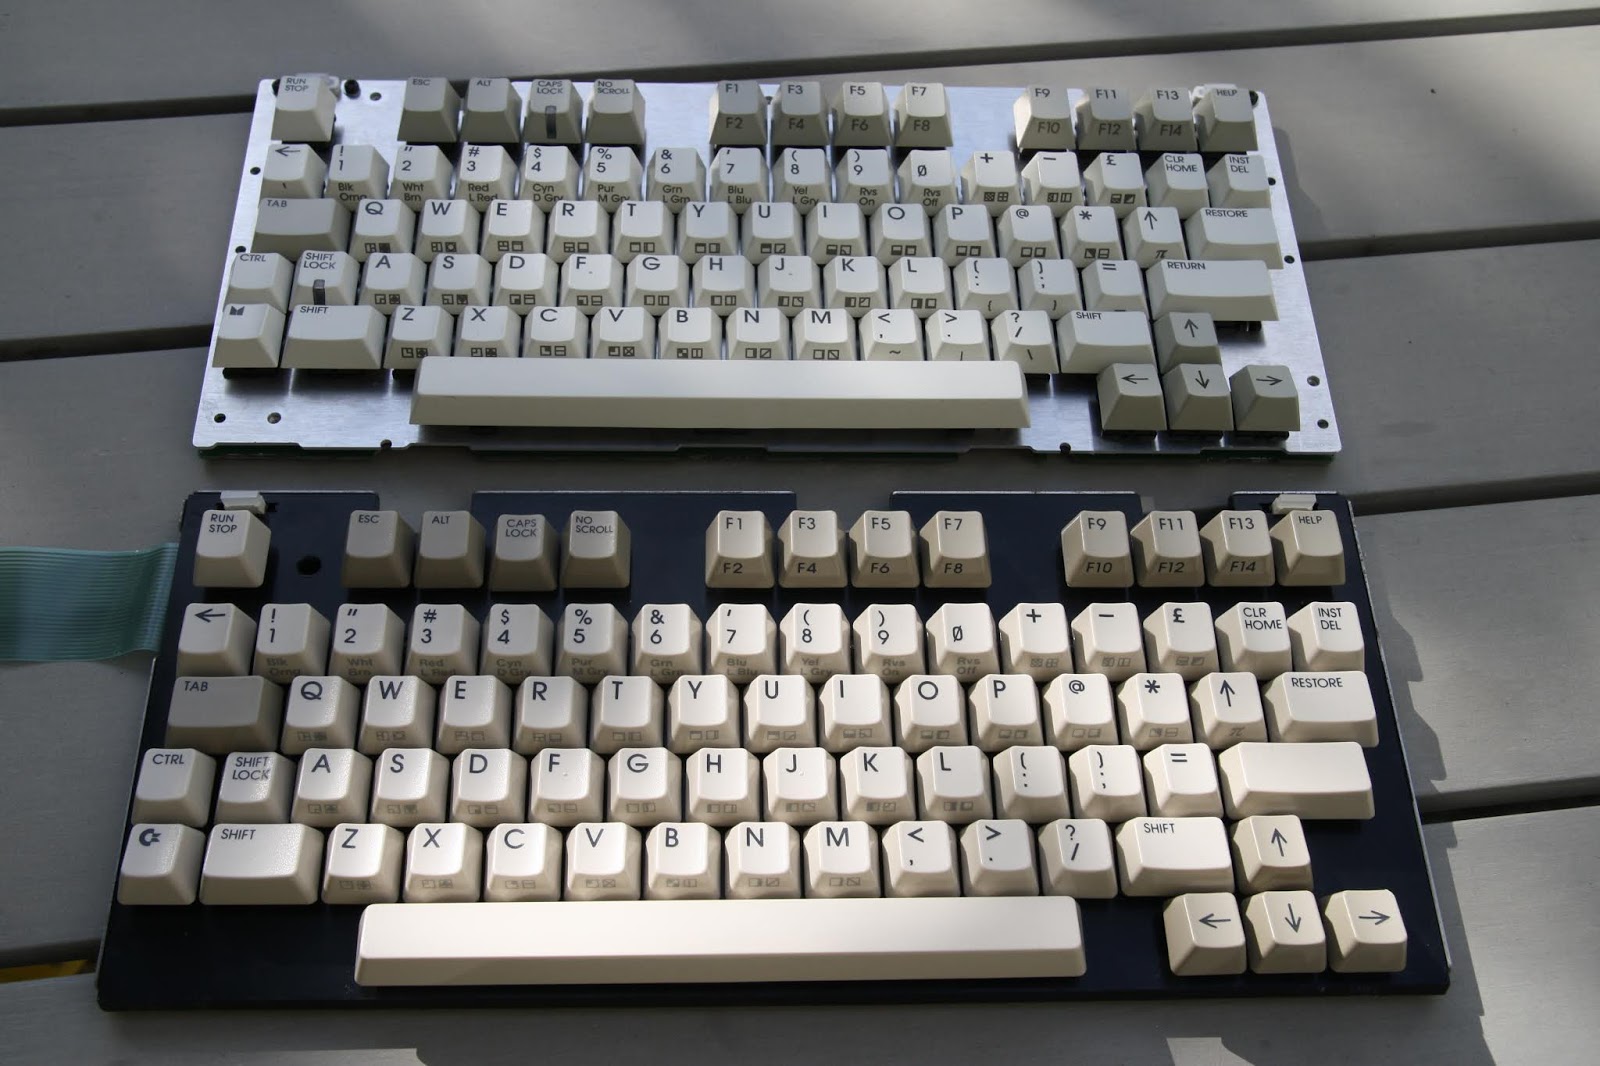
I am not particularly prone to being over excited, but I will confess to being just a bit excited when I saw the photos of the keyboard samples that have been produced for us for the MEGA65.

From the outset, we were exacting in our demands:

1. The space bar must be the full size.  This is no small thing, because NO ONE makes a 19cm wide space bar any more, and the injection moulding tooling for such a beast would cost thousands of dollars on its own.

2. The graphics symbols MUST be on the front, not on the top.

3. The shift and caps lock keys MUST be nice and clicky.

4. The whole thing must not in any way break the magic spell of 8-bit-ness.

Oh, and of course we have no money up-front to get the tooling made.

So we had set a high bar, and almost impossible conditions, and yet our friends at GMK have come to the party. And oh, how they have come.  There really isn't anything more to say.  I'll just show you some pictures.


The cases you can see in the first few shots are our 3D printed prototype cases: There is no CGI here -- just real objects.


What first struck me when I saw the first images, was that unless you really knew what you were looking for, you would have no idea that this was not an existing Commodore 65 prototype.  This is of course exactly the effect we want to create :)
* The peg is an optional extra, not included in the standard package.

 Trade-mark fun and games means you get the MEGA65 logo on the "Vendor Key". You can also see here that we have put an LED on the shift-lock and caps-lock keys, in the style of the old Amiga keyboards.

Our volunteer team went to a LOT of work to match the type-face of the original C65 keyboards.  These keyboards just look so fresh and crisp, and yet so 1990, all at the same time.

Across to the right hand side now, all the usual suspects are there.  We have also dealt with the "right cursor key rubs on case" issue that many original C65s had.  Again, the look of the keys is excruciatingly close to the original.

Now the whole keyboard from above (We have just noticed that Blogger has munged the image resolution. We will try to get higher-res images up soon).
 I'll just leave you in peace to take in the next few shots, before I comment again.


 The discerning viewer might notice that the MEGA logo is bleeding together a bit in the little vertical gap. We will tweak this. Also, the printing on the fronts of the keys is currently black instead of grey, and there is a little over-bleed on the graphical symbols. We will also get this fixed. But even as it is now, I find that it is a thing of beauty, and would be just fine, but we are not satisfied with "just fine", we want to get as close to perfection as we can.


 We can see here that the keyboard has a nice continuous slope to the key tops, nicer even than the original.


 In this next shot, you can make out the extra ASCII symbols we have put on the front of some keys that on a C64/128/65 lack any graphics symbols.  The symbols are {, }, _, ~, | and \, and will be accessed from native MEGA65 software by holding the MEGA key down.  It will also be possible to patch C64 and C65 ROMs to support them.  Backquote (`) is also avalilable as MEGA + the <- key, which can be spotted in some of the earlier photos.  Having these missing symbols will make it much more pleasant to do more modern workflows, or even just programming in C, or any other language that uses curly-braces.
 Now we look at the PCB.  Due to some tight deadlines, the keyboards have a slightly wrong PCB outline.  So we had two made with the correct PCB outline to fit into our case design, but that won't work, because lots of tracks have been cut.


Here you can see that we have a full metal plate in the keyboard.  Combined with the CPLD and diodes, this will be a keyboard that has no ghosting when used natively (C64 and C65 ROMs will still have ghosting, if you don't change the keyboard scanning routines, because they don't have perfect provision for a non-ghosting keyboard mechanism.  We might be able to work around this in the VHDL. We will see).


 And now some side-by-side comparisons with an original C65 keyboard:


Sunday, 9 September 2018

Freezing and the MEGA65 System Partition -- part 1

My current plan for the MEGA65 is that the core operating system will be focused around a hardware integrated freeze function, a bit like having a cartridge like the Action Replay built in.

Where we are going, you don't need one of these, as much as I love my Datel Action Replay (TM) when using a C64.


The idea here is that if you want to change disk images, or load a program, or switch to another program, these can all be logically handled from in the freezer.  Things like the current disk image are just flags in the Hypervisor's process descriptor for the currently running program.  Suspending and switching to other programs is of course the bread and butter of what a freeze cartridge does.

I started work on the freeze code a while back, and have just this week had a bit of time to come back to it, and got it to the point where freezing (mostly) works, although the un-freezer is yet to be written.

One of the challenges of the MEGA65 is that we have purposely made the core operating system only 16KB, partly to save hardware resources, and partly because the smaller something is, the less bugs it can hide.  Yet at the same time, we want to have a very functional and fun to use.

The way we are solving this dilemma of needing to be frugal versus making something that is a real joy to interact with, is that we are separating the Hypervisor functions from the freeze utility.  The Hypervisor will have functions to freeze and unfreeze, but will not have any user-interface built in.  Instead, when you hit the freeze/menu button, it will freeze the system to SD card, and then load the freeze menu program from SD card, in the form of a frozen system image, and give it special permission to make direct access to the SD card, so that it can look through the list of frozen programs, including pulling up the labels and thumbnail images that we can associate with them, and let the user choose one to load.  It will also let you change the floppy disk image attached (and switch to/from using the real floppy drive).


To make this work with the tiny hypervisor, we need to have an area of the SD card set aside for freeze images, and also for helper programs like the freeze menu.  We could have this in the FAT32 file system, but then we have to worry about whether files are contiguous, and update the FAT entries, all things that are rather a pain to do in a 16KB ROM.  Thus, instead, I have created the concept of a system partition for the MEGA65, that contains the freeze and service program slots, as well as a general configuration area, e.g., to remember whether you want 50Hz or 60Hz video on boot, and whether you want to enable 1351 emulation for Amiga mouses, and all the other sorts of things you want to remember between resets.

The system partition is created as a normal master boot record (MBR) partition, but with partition type 65 ($41).  Apart from this being the most obvious partition type number for us to want, it has the advantage that it isn't really used for anything on anything resembling a modern system.  Wikipedia says it was used for "Old Linux/Minix (disk shared with DR DOS 6.0) (corresponds with $81)", or "PPC PReP (Power PC Reference Platform) Boot".  Neither of these are likely to cause us any grief in typical usage.  Indeed, Linux, Windows and OSX all ignore partition type $41. This means we can have a MEGA65 system partition and a FAT32 partition for data storage, and if you take the microSD card out of the MEGA65 and put it into any modern computer, you will see the FAT32 partition, making it easy to transfer files, but won't be bothered by seeing the system partition.  If you want to modify the system partition, then this will be done using the existing MEGA65 system setup utility from the Hypervisor's Utility Menu, or by using the freeze menu.  So that's all fairly nicely sorted.

I hinted at the ability to have more than one service program installed in the system partition.  This is not accidental. The idea is that there can be many such programs installed on a MEGA65 system, and which can then be called from any program running on the MEGA65 in any mode.  This will happen by setting up a Service Program Call, which consists of setting up a little area of memory with the name of the service you want to call.  The Hypervisor then looks for a frozen service program with the same name, and loads it in, keeping only the first part of memory from the calling program as a transfer area. It can then do its job, say, downloading a file from a URL to SD card, and then updates the transfer area to say whether it succeeded or failed, and then calls a return-from-service-program Hypervisor trap that reverses the process.  This is a little, but only a little, like the Intent system on Android for inter-process communications.  Key differences include that the MEGA65 is never actually running multiple programs at the same time.

Writing the freeze routine was a bit interesting.  As mentioned, it has to be compact.  There is also the extra challenge that the MEGA65 has a lot more IO and little bits of state hanging around the place that need to be saved, including the SD card registers.  The usual path a freeze cartridge takes is to have some extra memory, so that you can stash a few things there while saving state. We have done the same, using the otherwise unused first 3KB of the 4KB BRAM we use for the SD card sector buffer.

To keep things compact, I made a list of memory regions and their sizes that have to be saved to the SD card, so that the table of memory regions to save/restore when freezing/unfreezing takes seven bytes each: four bytes for the
first address, followed by three bytes of length, allowing regions of up to 16MB to be represented.  I then added an eighth byte that is used as an entry in a look-up table that can contain special routines to prepare before saving the area.  This is used, for example, to save each of the four VIC-IV palette memories, only one of which can be mapped at a time.  The result is that the entire description of what to save, and how it should be done is a list of these regions.  Here is that list at the time of writing (we know there are a few things missing for now, and will add them in. Bonus points for working out what they are).

    ; SDcard sector buffer (direct access) and registers
    .dword $ffd6000
    .word $0290
    .byte 0
    .byte freeze_prep_stash_sd_buffer_and_regs

    ; SDcard sector buffer (F011)
    .dword $ffd6c00
    .word $0200
    .byte 0
    .byte freeze_prep_none

    ; Process scratch space
    .dword currenttask_block
    .word $0100
    .byte 0
    .byte freeze_prep_none
   
    ; $D640-$D67E hypervisor state registers
    .dword $ffd3640
    .word $003F
    .byte 0
    .byte freeze_prep_none

    ; VIC-IV, F011 $D000-$D0FF
    .dword $ffd3000
    .word $0100
    .byte 0
    .byte freeze_prep_none

    ; 128KB RAM + 128KB "ROM"
    .dword $0000000
    .word $0000     
    .byte 4          ; =4x64K blocks = 128K + 128K
    .byte freeze_prep_none   

    ; VIC-IV palette block 0
    .dword $ffd3100
    .word $0300
    .byte 0
    .byte freeze_prep_palette0

    ; VIC-IV palette block 1
    .dword $ffd3100
    .word $0300
    .byte 0
    .byte freeze_prep_palette1

    ; VIC-IV palette block 2
    .dword $ffd3100
    .word $0300
    .byte 0
    .byte freeze_prep_palette2

    ; VIC-IV palette block 3
    .dword $ffd3100
    .word $0300
    .byte 0
    .byte freeze_prep_palette3
   
    ; $D700-$D7FF CPU registers
    .dword $ffd3700
    .word $0100
    .byte 0
    .byte freeze_prep_none
   
    ; 32KB colour RAM
    .dword $ff80000
    .word $8000
    .byte $00
    .byte freeze_prep_none

    ; End of list
    .dword $FFFFFFFF
    .word $FFFF
    .byte $FF
    .byte $FF


The labels in bold are the index entries for the various setup routines. These are actually called by using a 65C02 jump table, using the following:

     jmp (freeze_prep_jump_table,X)

freeze_prep_jump_table:
    .alias freeze_prep_none 0
    .word do_freeze_prep_sdcard_regs_to_scratch
    .alias freeze_prep_palette0 2
    .alias freeze_prep_palette1 4
    .alias freeze_prep_palette2 6
    .alias freeze_prep_palette3 8
    .alias freeze_prep_stash_sd_buffer_and_regs 10
    .word do_freeze_prep_palette_select
    .word do_freeze_prep_palette_select
    .word do_freeze_prep_palette_select
    .word do_freeze_prep_palette_select
    .word do_freeze_prep_sdcard_regs_to_scratch


Where the X register has been set to the value of the eighth byte.  This is why the indexes are all even values, so that the jump table works without extra fiddling.   The .alias directives setup the value required to call the routine, which we do there in the jump table, so that it is easier to keep them in sync, if we modify things.

What is required in each setup routine differs somewhat. The palette ones are interesting, because all they need to do is to modify the VIC-IV memory map.  To save some space, the same routine is used for each, and uses the value of the X register that was used to do the jump into the jump-table:

do_freeze_prep_palette_select:
    ; X = 6, 8, 10 or 12
    ; Use this to pick which of the four palette banks
    ; is visible at $D100-$D3FF
    txa
    clc
    sbc #freeze_prep_palette0

    ; A now contains 0 if palette0, 2 if palette1 etc
    ; Shift it left six bits, so that that value 0-3 goes into
    ; the bits that control which palette bank is currently
    ; memory mapped
    asl
    asl
    asl
    asl
    asl

    ; Update VIC-IV memory map
    sta $d070
    rts

Thus we need only 13 bytes to implement four of these helper routines.  Some are more complex, in particular, the one that saves the state of the SD controller, since for that we have to save some registers and the SD card sector buffer itself into the 3KB RAM dedicated to the freezer I mentioned earlier.  That said, it isn't too complex, it is really just a case of copying the memory from the SD controller registers and sector buffers.

So that's the overall structure for how we are implementing freezing, and the result is reasonably compact and maintainable, which are our primary goals.  That isn't to say that we didn't have (and don't still have) bugs in the code.  To help track those down, and to make sure that programs are being frozen properly, we began writing a little Linux utility that reads an SD card and looks for a MEGA65 system partition and is able to find the freeze slots,  and save them out to files.  This helped us find some problems, such as if a single memory region was >64KB, the same 64KB was being saved repeatedly. That utility is still very much a work in progress, which we expect will get refined over coming weeks.


In terms of freezing speed, at the moment, it takes about one second to freeze using a class-10 microSD card.  This is mostly because our SD controller doesn't (yet) support sequential block writes.  This means the SD card writes an entire ~64KB flash block every time we write a 512 byte sector.  As a result, it spends perhaps 100x more time writing to flash than is required, and will wear the flash out that much faster too, in all likelihood. For both these reasons, we intend to implement sequential writes to the SD card.  Given our SD card interface is capable of about 3MB/sec, and freezing the entire state of the MEGA65, assuming all memory etc is being used, requires somewhere around 0.5MB, this should let us get the freeze time down to about 1/6 second, which seems like it should be pretty good.


Wednesday, 30 May 2018

Resurrecting the MEGA65 VNC server interface

Ages back we had a VNC server for the MEGA65, partly just for fun, and partly as a way to get nice digital screen shots of the MEGA65 for use here on the blog and elsewhere.  This all fell into disrepair after a while as we focussed on other things, including the change of video mode and the related activity around that, to make sure that the M65 platform is stable for some time to come.

Anyway, now I want to be able to make nice digital screen captures again, instead of taking photos all the time, so I have spent a couple of days getting it all working again, and trying to make it quite a bit better than it was before.

Back almost four years ago (gadzooks, we have been working on the MEGA65 for a long time now!) the VNC display was extremely lethargic, in part because at 1920x1200 we could transmit only 1 in every 13 raster lines over the 100mbit ethernet, as any more would have simply eaten all the bandwidth, because 1920x1200 = ~2Mpixels x 60 frames per second = 120MiB/sec = ~10x too much for 100Mbit ethernet.

But now that we are at 800x600, the bandwidth equation is quite a bit different.  800x600 = ~0.5Mpixels, and so a full 50 frames per second in PAL needs only 25MiB -- still too much, but tantalisingly close that I thought about how I could compress the data stream enough for it to work in the typical case.

100Mbit ethernet can realistically do about 10MiB of useful data per second, so we need to reduce the average data per pixel to < 10/25 bytes = ~3.2 bits per pixel.  At the same time, it would be nice to have at least 12-bit colour depth, so that the images look nicer than the old 3-3-2 8-bit colour cube I had to use with the old one.

I figured a nice bit-packed compressed format should do it: a 0 means repeat the same colour as last time, and 10 means use the most recently used colour.  With this, a 2-colour screen, like the C64 start-up screen should average (1+2)/2 = 1.5 bits per pixel -- easily within our envelope. But of course most of the time the border is a solid colour, as is much of the screen, so I also added a 16-bit sequence that indicates that upto 255 pixels of the same colour occur in a line.  Then I added some four-bit sequences so that we can cheaply switch among the five most recently used colours, as I figure this should probably be sufficient for most purposes.

Of course, this is all quite a bit more complex than the old one, and so most of the time has been spent debugging all the special cases of bit shuffling in the encoder, which is of course fully in hardware in VHDL, which makes it all a bit interesting.

After some effort, it mostly works. I can see the C64 and C65 start-up screens, and the C64 screen takes only about 0.5MiB per second to stream at 50Hz, so about 10KiB per frame, which is more than acceptable.

There are always lots of little fiddly bits with these sorts of things, as the state machine for the encoder (in VHDL) and the state machine for the decoder (in C) have to follow each other exactly.  I think it now matches nicely, but I am still seein the occasional glitched raster, which I think is when it switches from one packet to the next, or else it could be the little 32 bit buffer for the compresser overrunning, although since it happens even on the 2-colour C64 start-up screen, which definitely lacks the complexity to cause overruns, I suspect this is not the case. It could feasibly be lost packets as well, as the bit stuffing spans packets, without resetting.  Anyway, it results in only a few glitched lines per second, which while noticeable when it is running freely, are usually not there if you do a single-frame screen grab, which is the primary purpose of implementing it.

The bigger problem is that the pixel valid signal that tells the frame packer when to capture a pixel is not in sync with the output of the VIC-IV.  This is because the pixel valid signal does not pass through some of the compositing and filtering output stages, and thus arrives a few cycles early.  Because the output pixel clock is a non-integer fraction of the internal clock of the VIC-IV, there is jitter between the two, which means if the two aren't in sync you don't just get the wrong pixel in a consistent manner, but rather there is some variation as you scan across the line, that effectively distorts the display, like this:


The effect is particularly noticeable here with in 80 column mode, because each pixel corresponds exactly to one display pixel -- so we see some pixels doubled in width, while others disappear.  There are also some other little glitches here, like the display is not properly centred (which should be easy enough to fix), and the funny notching into the right border (which I am not sure if it is caused by the encoder or the decoder; I'll have to do some more testing to work out what the cause of that is.)

So, I added a single cycle delay to the pixel strobe signal, and now it is displaying much more nicely:

While it can't be seen here, the notching of the border is still happening, as is the occasional glitching line.  Nonetheless, it is now at the point of basic usability.

What is annoying, is that in the process a memory corruption bug has crept in. I am suspecting that this is due to lack of timing closure, but I can't be immediately sure.

The next step was to think about how I could setup an easy work flow for capturing high-quality video streams direct from the MEGA65 via this VNC feed.

A bit of digging around revealed that ffmpeg can capture directly from an X11desktop.  If I started the VNC server and viewer automatically, and worked out where the window was, I could indeed make it automatically record.  This is still a bit of a work in progress, but it already works (Linux only for now):

if [ "x$1" == "x" ]; then
  echo "usage: record-m65 <network interface>"
  echo ""
  echo "NOTE: You must first enable the ethernet video stream on the MEGA65"
  echo "      sffd36e1 29 from the serial monitor interface will do this."
  exit
fi
make bin/videoproxy bin/vncserver
pkill vncserver
sudo echo
sudo bin/videoproxy $1 &
sleep 1
bin/vncserver &
sleep 1
vncviewer localhost &
sleep 2
xwininfo  -name "VNC: MEGA65 Remote Display"
x1=`xwininfo  -name "VNC: MEGA65 Remote Display" \

    | grep "Absolute upper-left X:" | cut -f2 -d: | sed s'/ //g'`
y1=`xwininfo  -name "VNC: MEGA65 Remote Display" \

    | grep "Absolute upper-left Y:" | cut -f2 -d: | sed s'/ //g'`
wmctrl -a "VNC: MEGA65 Remote Display"
rm output.mp4

ffmpeg -video_size 800x600 -framerate 50 -f x11grab \
    -show_region 1 -i :0.0+${x1},${y1} output.mp4
pkill vncserver

Basically it makes sure you have told it which network interface to listen on, makes sure that the necessary tools from in the MEGA65 source tree have been built, and then runs the video proxy (this requires root, because at the moment it has to operate as a packet sniffer, because the video containing ethernet frames the MEGA65 produces are effectively raw frames), starts the VNC server to use that, and then uses xwininfo to figure out where the window is on the screen, uses wmctrl to bring that window to the foreground, and then runs ffmpeg to do the capture.

The main wrinkles in this at the moment are that the video stream does not contain any audio, so the recorded video is only video, without any sound, and that you hvae to manually stop the script to stop it recording, which means you typically end up with a second or two of terminal window output at the end.

Apart from that, however, it works very nicely, as the following video shows.  The capture is at a full 50Hz, and the quality is great.  Indeed, the quality is so great it records those glitches I mentioned earlier. Because it is a direct digital capture, the files are also quite small.  So in this case, where most of the screen is a single colour, 23 seconds of video requires only 330KiB, and I suspect a lot of that will actually be the second or so of Linux terminal window you see at the end.


You can also see the timing closure problem I mentioned, in the form of the corrupting of the last few bytes of the screen.  Finding and fixing the root cause of that is the priority for me now, followed by fixing the visual glitches.

So, fixing the timing closure problem turned out to be quite simple. So with that fixed, I could again run some software.  This time we have a 5.5MiB file for about 1.5 minutes, which is still very nice, around 60KiB per second, or a little over 1KiB per frame.   Of course if we add audio in, then this will go up a bit.  But for now, here is me trying to remember how to get the joystick working on PS/2 keyboard input and play a little Impossible Mission:


Some of the glitching in this video confirms that there is an encoder or decoder problem, as the border notching is in fact one too many pixels being decoded somewhere along the line.  It is possible that whatever that problem is, that it might in fact be the cause of the glitch lines, if it is actually the encoder and decoder failing to track state correctly. Hopefully those problems won't be too hard to track down.

[Edit: It looks like Blogger has munged the video from the nice crisp videos I uploaded.  However, overall the effect isn't all bad, as the videos look almost like a real CRT display.  So I'll just leave them as they are for now.  The full crispness can be seen in the screen grab above, in any case.]

Wednesday, 16 May 2018

Migrating from Xilinx ISE to Xilinx Vivado FPGA software

Until now, we have been using the old (and deprecated) Xilinx ISE software to compile the VHDL for the MEGA65 project. This is all a bit of an accident of history, because when the project first began in 2014, ISE was only just at end of life, and deficiencies in my VHDL programming style meant that I couldn't get it to work in Vivado.  Also, Vivado was less mature at the time.

Now, all that has changed: ISE is well and truly end of life, and approaching the zombie stage.  Vivado is now much more mature. But perhaps most importantly, Kenneth, one of our volunteers has put in a LOT of work silently in the background helping to move the project over to Vivado. 

The work involved, and the value to the project of doing this cannot be understated.

First, synthesis time under Vivado is fully 10x faster than under ISE.  This means we can do a synthesis run in ~10-15 minutes, instead of ~2-10 hours.  The benefit of this cannot be overstated.

Second, by fixing the semantics of memory access of the internal memories in the FPGA, a whole raft of instabilities have been fixed. These instabilities were causing differences in behaviour on different FPGA chips of the same model, and generally causing many lost hours due to chasing my tail on the symptoms of the problem, rather than the cause.

Third, Vivado achieves better timing closure.  This means that it is easier to get the design to run at the correct clock speed.  It also opens the door to increasing the clock speed in the future.

Finally, we are now somewhat future-proofed for ongoing development for the foreseeable future.

While most of the changes have been in the background, there are a few practical differences.  One of those is that various fixes along the way have improved our Bouldermark score somewhat to 38,980 (up from about 31,000).  This means we have a Bouldermark score 124x that of a stock C64. However, as previously explained, Bouldermark is a bit non-linear, in that the first few hundred points are quite a lot harder to get than the majority. This is consistent with the results of the Chameleon 64, which gets a Bouldermark score of 44.62x, but only 10.79x on Synthmark (our current Synthmark score is, for reference, 51x).


Kenneth gets an extra gold star for having found and fixed a problem with self-modifying code that was previously causing Bouldermark (and presumably other things) to not run stably.  This was all part of the same memory access semantics problems: In this case, it was possible for the CPU to begin fetching the next instruction before the RAM had time to update internally to present the updated value.  While this sounds absurd, when the clock cycles are only 20ns, propagation time inside components becomes a real consideration.

Wednesday, 11 April 2018

GOSUB variable in C64 BASIC

While writing a program with a student, we wanted to make an efficient dynamic jump table under C64 BASIC 2, where could have an array of line numbers that represent event handlers for particular events.  The idea is that we would then GOSUB JT%(EVENT) to dispatch to the appropriate handler, and be able to freely update the jump table as we go.

However, C64 BASIC doesn't allow this.  I am not really sure why they made the GOTO command (which is the heart of GOSUB also) unable to resolve variables. It would have meant that the ON ... GOTO command could have been left out, saving ROM space, for example.

Anyway, a bit of poking around found that other people have tried to do this, but none of their solutions really seemed particularly nice.

So, I thought, is it possible to do this just using BASIC 2, and without any assembly routines?

The answer is YES! Using the rather under utilised technique of self modifying BASIC programs.  Is this a horror beyond comprehension?  Probably.  But it also works a treat :)

So, here is how it works:

1. Have a GOSUB command somewhere in your basic program that you can reliably find in memory. I made it GOSUB,21456 in my program.  The number doesn't matter, provided it is 5 digits long, so that we have space to overwrite with any valid line number we might encounter.  The comma is there because GOSUB+COMMA = SYNTAX ERROR, and thus should not exist in any sensible program*. 

2000 REM THIS IS THE ROUTINE THAT WILL GET MODIFIED DURING EXECUTION
2010 GOSUB,21456
2020 RETURN

2. Find out where in memory that line lives, but searching for the GOSUB token (141) and the comma:

1000 FOR JA = 2048 TO 40959: IF PEEK(JA-1)<>141 OR PEEK(JA)<>44 THEN NEXT: RETURN


(By doing the comparison in the negative sense, the loop continues until it finds the location, and then aborts as soon as it finds it).

3. To GOSUB to any line, have a routine like this:

1100 REM GOSUB TO LINE IN VARIABLE LN
1110 LN$=STR(LN): REM GET STRING VERSION OF LINE NUMBER
1120 REM REPLACE ,21456 WITH CORRECT LINE NUMBER
1130 FORI=0TO5:POKEJA+I,32: REM FIRST RUB OUT WITH SPACES IN CASE LINE NUMBER IS SHORT
1140 FORI=0TOLEN(LN$)-1:POKEJA+I,ASC(RIGHT$(LEFT$(LN$,I),1)):NEXT
1150 GOSUB 2000
1160 POKEJA,44: REM PUT THE COMMA BACK READY FOR NEXT TIME
1170 RETURN

(The astute reader will realise that they can merge steps 1 and 3 to give something like:

1100 REM GOSUB TO LINE IN VARIABLE LN
1110 LN$=STR(LN): REM GET STRING VERSION OF LINE NUMBER
1120 REM REPLACE ,21456 WITH CORRECT LINE NUMBER
1130 FORI=0TO5:POKEJA+I,32: REM FIRST RUB OUT WITH SPACES IN CASE LINE NUMBER IS SHORT
1140 FORI=0TOLEN(LN$)-1:POKEJA+I,ASC(RIGHT$(LEFT$(LN$,I),1)):NEXT
1150 GOSUB,00000
1160 POKEJA,44: REM PUT THE COMMA BACK IN CASE WE WANT TO RUN AGAIN
1170 RETURN

Now you can GOSUB to any line you like with a simple program like:

10 GOSUB 1000: REM ONE-TIME ONLY LOOKUP PATCH ADDRESS
20 LN=12345: GOSUB 1100: REM GOSUB TO LINE 12345
999 END

Here is a complete program, and an example of it running. It is short enough to fit on a single screen, even with some comments!


* I don't claim that this program is sensible. It is also possible for it to show up in a string that has shift-M followed by a comma, but I can avoid that easily enough.

Sunday, 1 April 2018

Optimising infinite loops with VHDL

It's been a while since I have tried to improve the CPU performance of the MEGA65, so I thought I would take a look at an optimisation I hadn't tackled yet: Accelerating infinite loops.  This sort of loop isn't normally accelerated because they occur so rarely in programs on modern computers. 

However, on 8-bit systems it wasn't uncommon to have an infinite loop occupy the CPU, and the rest of the work occurring in interrupt routines.  This means that there is a surprising amount of CPU time wasted infinite loops that we can try to reduce.  We can get an idea of just how much potential benefit we can obtain by applying Amdahl's Law

Basically if 1/10th of the CPU time is spend on a particular task, this means that even if that task can be made to take no time at all, that we can only reduce the run time to 100% - 1/10, i.e., it will still take 90% of the original time.  This is where accelerating infinite loops has such great potential:  If the task would have taken infinite time, and we can reduce that to finite time, then we have gained a massive advantage.  Even better, if we can reduce the infinite time to practically zero, then we can gain an infinite speed up.  That is because, if we speed up the infinite part to take practically zero time, we have speed up the overwhelming majority of the task.  For any finite remaining run time, the ratio of speed up will be infinity / remaining run time, and since infinity divided by a finite quantity still equals infinity, the result is infinite speed up.

This all sounds great, but how can we go about achieving this in practice?  For a start, there are all sorts of infinite loops that we can have to contend with.  Again, a fortunate situation is that on 6502 systems the vast majority of infinite loops take the simple form of a JMP instruction that jumps to itself, such as:

2000 JMP $2000

The first trick is how to efficiently detect these operations. Fortunately this is simple: If the same JMP instruction is encountered two instructions in a row, it means that the code path has become invariant, and an infinite loop will eventuate. In fact, this method is robust enough that it can be used to detect a surprisingly wide range of infinite loops. The second trick is to know how to achieve the effect of the infinite loop. Fortunately JMP instructions don't perform any other computation, or cause unpredictable changes to the processor flags, so we can, in fact, simply ignore the instruction on the second iteration, falling through to the next instruction in memory -- thus effectively executing an infinite loop in a about 12 clock cycles, i.e., 12 x 20ns = 240ns.  That is, we can execute an infinite loop in about 1/4 of a single CPU cycle on the C64, or slightly faster than a single CPU cycle on a C65.  While there is scope to further improve on this, it will be good enough for now.

So, first step is to modify the CPU to detect back-to-back jumps to the same address, and to abort the jump when this occurs.  This turned out to be trivial. Here is the complete patch:

diff --git a/src/vhdl/gs4510.vhdl b/src/vhdl/gs4510.vhdl
index e2036f7..87b4852 100644
--- a/src/vhdl/gs4510.vhdl
+++ b/src/vhdl/gs4510.vhdl
@@ -1173,6 +1173,9 @@ architecture Behavioural of gs4510 is
   signal reg_math_cycle_counter_plus_one : unsigned(31 downto 0) := to_unsigned(0,32);
   -- # of math cycles to trigger end of job / math interrupt
   signal reg_math_cycle_compare : unsigned(31 downto 0) := to_unsigned(0,32);
+
+  signal reg_last_jump : unsigned(15 downto 0) := to_unsigned(0,16);
+  signal last_was_jump : std_logic := '0';
  
 begin

@@ -6136,8 +6139,16 @@ begin
               end if;
              
               if reg_microcode.mcJump='1' then
-                report "Setting PC: mcJump=1";
-                reg_pc <= reg_addr;
+                if reg_last_jump /= reg_addr or last_was_jump='0' then
+                  report "Setting PC: mcJump=1";
+                  reg_pc <= reg_addr;
+                else
+                  report "Accelerating infinite loop";
+                end if;

As can be seen, all we have had to do, was to add a couple of signals to remember if the last instruction was a jump, and where the jump went. We then only take the jump if the immediately preceeding instruction was not an identical jump.

A quick test using GHDL to verify that it works under simulation was the next item on the list.  For this, I added an infinite loop at the reset entry for the MEGA65 Kickstart. This would have normally caused the MEGA65 to take an infinite amount of time to proceed with the boot process.  But now, we see the following simulation output:

@5190ns:(report note): Setting PC to $80xx/8100 on hypervisor entry@5370ns:(report note): Setting PC: mcJump=1@5450ns:(report note): $8100 4C 88 A1  jmp  $A188
@5490ns:(report note): $A188 78        sei
@5610ns:(report note): Setting PC: mcJump=1@5690ns:(report note): $A189 4C 89 A1  jmp  $A189
@5810ns:(report note): Accelerating infinite loop@5890ns:(report note): $A189 4C 89 A1  jmp  $A189

@6010ns:(report note): Setting PC in JSR/BSR (fast dispatch)
@6050ns:(report note): $A18C 20 D8 A0  jsr  $0104
@6090ns:(report note): $0104 78        sei


I have highlighted the important lines above. As we can see, the infinite loop is entered at 5,610ns, and is detected at 5,810ns, and the following instruction is executed at 5,890ns.  Thus the total cost of the "infinite" loop was a mere 280ns -- a little slower than I predicted, but still quite acceptable.  It will certainly do for now, until I have time to track down where the other 40ns has gone.