Wednesday, 23 March 2016

First community developed title with MEGA65 support?

We recently found out about the following release: http://csdb.dk/release/?id=142464


This is basically a Wolfenstein-like ray-tracing engine for the C64, which seems to be amazingly memory efficient and rich in functionality. In fact, it seems to be capable enough to make an actual Wolfenstein-style game on the C64.

It is also EXTREMELY slow on a real C64. In fact, even on a SuperCPU, or in VICE running in warp-mode on my i7 Mac, it is still quite slow.

What is very nice is that the author appears to have added support for the MEGA65.

Here is a video of it running on the MEGA65 at 48MHz.  Compared to my 2.7GHz i7 Mac running VICE, the MEGA65 is somewhere between 2x and 5x faster, as far as I can judge.  It would be great if the demo included a frames per second measure, so that we can benchmark more precisely.  It would also be great if someone with a Chameleon could test it on there, so that we can get a sense of the relative speed between the Chameleon and current MEGA65 state.


Tuesday, 22 March 2016

Prototyping the keyboard

We have just received a prototype keyboard that we have had WASD Keyboards build for us. This keyboard is based on a normal 87-key keyboard layout, and is intended to be a design that can be used for people building their own MEGA65 using the Nexys4 FPGA boards.

As the keyboard layout doesn't exactly match the C65's keyboard, we have had to make some adjustments, which I will explain in a moment. But first, the pictures:


First up, we think that WASD have done a great job, and made a very beautiful keyboard. We thought quite hard about the keyboard layout, to make it both useful and as true as possible to the original keyboard layout, and preserve the "8-bit" feel.

First, the top line from RUN/STOP to HELP match the C65 keyboard exactly. We then also put CLR/HOME and RUN/STOP on two of the three keys to the right, so that it would be easy to find those keys using muscle memory, to overcome the interference of the six key block below these three keys.  The pound key is also put on that row, because there wasn't room for it in the main block. This is also why the up-arrow and equals keys are moved to the key blocks on the right.

We then used the remaining four spare keys there for some common ASCII characters that were missing from the original keyboard, to make the MEGA65 keyboard more useful.  We also added a FAST/SLOW key for changing the CPU speed more conveniently.

The other most obvious changes are to have duplicated the C= / MEGA key, so that there is one on the right as well as left, and the inclusion of the FIRE and JOY LOCK keys.  Those two keys allow use of the cursor keys as a make-shift joystick.  The FIRE key simply mimics the fire button on a joystick, and by pressing the JOY LOCK key, the cursor keys toggle between acting as normal keys or as a joystick. SHIFT or one of the other modifier keys (yet to be decided) will be able to toggle which joystick port is to be controlled in this way.

We are still working on having a completely custom keyboard made, which would also have symbols printed on the front of the keys like on a real C65, instead of just on the top of the keys, and would exactly match the C65 keyboard in key layout.  More on that as we make progress.

Sunday, 13 March 2016

We're still alive / Wir leben noch

English:

Just a short post to break the radio silence, and let you all know that after a quiet period over Christmas and start of University semester, we are picking up steam again.

First, we now have a couple of students working on VHDL and other aspects of the project, together with another volunteer.  So we have gone from having just me working on all the VHDL alone to having a lovely team now! I am extremely glad of this, partly because I know there are plenty of better VHDL coders than me, but also because tracking down bugs in VHDL code is best done with plenty of time and focus, which I haven't had at my disposal lately.  Thus we will hopefully get the known CPU bugs fixed over the next few weeks, and progress forward with implementing 6502 illegal opcodes, improving the CIA implementation, adding bitplanes and doing all the other stuff that needs to happen on the VHDL front.

Second, we have been making some nice progress on the keyboard front, including with some really great volunteer assistance, for which I am also very grateful.  We are simultaneously exploring options ranging from custom key-caps on a standard 87-key USB keyboard, through to full custom manufacture of a keyboard. We have no firm idea of the costs at either end of the spectrum, but we do have some clear paths now to get to that point.  Hopefully I will be able to share some images of the keyboard designs, so that we can have some nice pictures instead of just text in the next blog post.

So, that's about it for now, just, as I said, to let you know that we are still alive and working on stuff.

Deutsch:

Vielleicht  wissen schon einige von euch, dass ich Deutsch lerne. Deshalb werde ich einige Posts auch auf deutsch schreiben.  Natürlich ist mein Deutsch noch nicht sehr gut. Aber ich werde es versuchen.

Es hat eine ganze Weile gedauert, seit dem letzten Post.  Weihnachten und Sylvester ist vorbei und auch der Anfang des Universitätsjahres.  In Australien beginnt das Universitätsjahr im Februar und im November ist es zu Ende.  Inzwischen habe ich nicht viel Zeit gehabt, aber jetzt habe ich ein bisschen. Viel besser, wir haben neuen Studenten und Freiwillige, die dem MEGA65 Projekt helfen. Wir haben zwei Studenten und einen Freiwilligen, um mit dem VHDL zu helfen und einen Freiwilligen mit der Tastatur zu helfen. Deshalb sollten wir bald neue Bitstreams und auch interessante Fortschritte mit der Tastatur haben.  Ich freue mich sehr darüber, dass wir die CPU Fehler endlich reparieren und die andere VHDL Sache abhaken können. Das braucht natürlich seine Zeit.

In Bezug auf der Tastatur, schauen wir um verschiedene Optionen an. Auf der einen Seite, denken wir über eine 87-Taste USB Tastatur Lösung nach. Das wir natürlich billiger sein, aber nich so schön wie eine ganz maßgeschneiderte Tastatur. Aus diesem Grund kommen auch maßgeschneiderte Tastaturen in Frage. Er wird mindestens ein paar Wochen brauchen, bevor wir eine genauere Vorstellung von den Kosten haben. Unser super Freiwilligen helfen bei dieser Sache sehr.

Sunday, 3 January 2016

Making Hypervisor debugging easier

The hypervisor has bugs. This isn't really a surprise.

The problem is how to make it easy and efficient to debug the hypervisor.  I can already put break-points on the CPU via the serial monitor, however, that is a rather frustrating process, partly because the assembler I am using doesn't emit a nice symbol table to let me easily work out where to break.  So I wanted an easier approach.

I know there is a bug in the DOS function for opening and reading from a directory from user-land, which makes the whole machine reset back to kickstart trying to boot the machine.  This was the catalyst for me to find a nicer way.

So what I have done is to implement a checkpoint function in the hypervisor, which writes characters directly to the serial monitor interface.  With that, I could easily emit messages indicating where in the hypervisor the code has reached, and thus help to track down where things are going west.

I wanted this checkpoint system to be as simple to use as possible, so that I could easily add and remove checkpoints throughout the hypervisor code, but at the same time I want the checkpoint routine to show useful information, such as the address it was called from, and the current contents of the major registers.  So with something like:

   jsr checkpoint

I want it to produce output on the serial interface like:

Checkpoint @ $886C A:$0C, X:$04, Y:$10, Z:$03, P:$34 :

That would be a big step forward, but what I would really like, is to be able to attach text messages to each checkpoint, so that I can very easily relate them back to the source code, e.g.:

   jsr checkpoint
   .byte 0,"dos_readdir <1>",0

Should generate something like:

Checkpoint @ $886C A:$0C, X:$04, Y:$10, Z:$03, P:$34 :dos_readdir <1>  

That way, with checkpoints throughout the code, I should easily be able to generate progress logs of the hypervisor like the following, which traces a single call to dos_readdir:

Checkpoint @ $886C A:$0C, X:$04, Y:$10, Z:$03, P:$34 :dos_readdir <1>           
Checkpoint @ $8885 A:$00, X:$04, Y:$10, Z:$03, P:$37 :dos_readdir <2>
Checkpoint @ $889C A:$02, X:$00, Y:$1A, Z:$03, P:$37 :dos_readdir <3>
Checkpoint @ $88DC A:$80, X:$10, Y:$1A, Z:$03, P:$37 :drd_isdir
Checkpoint @ $88F4 A:$00, X:$FF, Y:$1A, Z:$03, P:$B5 :drce1
Checkpoint @ $8904 A:$02, X:$00, Y:$1A, Z:$03, P:$37 :drce1 <2>           
Checkpoint @ $8915 A:$81, X:$00, Y:$1A, Z:$03, P:$B5 :drce1 <3>           
Checkpoint @ $8923 A:$81, X:$00, Y:$1A, Z:$03, P:$B5 :drce_next_piece <1>
Checkpoint @ $8960 A:$00, X:$1B, Y:$0C, Z:$03, P:$37 :drce_next_piece <2>
Checkpoint @ $8986 A:$00, X:$00, Y:$0C, Z:$03, P:$36 :drce_next_piece <3>
Checkpoint @ $8A1A A:$00, X:$01, Y:$03, Z:$04, P:$36 :drce_ignore_lfn_piece
Checkpoint @ $8A39 A:$C0, X:$01, Y:$10, Z:$04, P:$B5 :drce_ignore_lfn_piece <2>
Checkpoint @ $8923 A:$C0, X:$01, Y:$10, Z:$04, P:$B5 :drce_next_piece <1>
Checkpoint @ $8960 A:$00, X:$1B, Y:$0C, Z:$04, P:$37 :drce_next_piece <2>
Checkpoint @ $8986 A:$00, X:$00, Y:$0C, Z:$04, P:$36 :drce_next_piece <3>
Checkpoint @ $89B8 A:$67, X:$05, Y:$0B, Z:$00, P:$36 :drce2
Checkpoint @ $89DA A:$2E, X:$0B, Y:$1A, Z:$00, P:$36 :drce3
Checkpoint @ $89FC A:$38, X:$0D, Y:$20, Z:$00, P:$36 :drce4
Checkpoint @ $8A1A A:$00, X:$0D, Y:$20, Z:$00, P:$36 :drce_ignore_lfn_piece
Checkpoint @ $8A39 A:$E0, X:$0D, Y:$10, Z:$00, P:$B5 :drce_ignore_lfn_piece <2>
Checkpoint @ $8923 A:$E0, X:$0D, Y:$10, Z:$00, P:$B5 :drce_next_piece <1>
Checkpoint @ $8A77 A:$22, X:$1B, Y:$0B, Z:$00, P:$35 :drce_shortname
Checkpoint @ $8A96 A:$5F, X:$1B, Y:$00, Z:$00, P:$34 :drce_shortname <2>
Checkpoint @ $8ABA A:$31, X:$0B, Y:$0B, Z:$00, P:$37 :drce5
Checkpoint @ $8B28 A:$0D, X:$0B, Y:$0B, Z:$00, P:$35 :drce_already_have_long_name
Checkpoint @ $8B78 A:$22, X:$04, Y:$0B, Z:$00, P:$35 :drce_fl <1>
Checkpoint @ $8BAB A:$01, X:$04, Y:$10, Z:$00, P:$37 :drce_noteof

The source code for part of the hypervisor that produces the above log has simple and easy to read (and later remove) checkpoint annotations:

dos_readdir:
; Get the current file entry, and advance pointer
; This requires parsing the current directory entry onwards, accumulating
; long filename parts as required.  We only support filenames to 64 chars,
; so long names longer than that will get ignored.
; LFN entries have an attribute byte of $0F (normally indicates volume label)
; LFN entries use 16-bit unicode values. For now we will just keep the lower
; byte of these

jsr checkpoint
.byte 0,"dos_readdir <1>",0

; clear long file name data from last call
lda #0
sta dos_dirent_longfilename_length

jsr checkpoint
.byte 0,"dos_readdir <2>",0
jsr dos_file_read_current_sector

jsr checkpoint
.byte 0,"dos_readdir <3>",0

ldx dos_current_file_descriptor_offset
lda [dos_file_descriptors+dos_filedescriptor_offset_mode],x
cmp #dos_filemode_directoryaccess
beq drd_isdir
cmp #dos_filemode_end_of_directory
bne drd_notadir

jsr checkpoint
.byte 0,"dos_readdir <4>",0

The checkpoint function itself is not too complex. The main things it needs to do is to save the major registers into some scratch space, pop the return address of the stack, so that we can show the call address in the output, and also update the return address to skip any message to be displayed.  

Other than that, it is mostly focused on preparing the message to be written to the serial monitor interface.  To keep the hardware simple, the serial monitor doesn't look after the timing between characters, so if the checkpoint routine sends characters too quickly, they will be lost. Thus the checkpoint routine has a loop to that waits between sending successive characters.  Since each checkpoint message is about 100 bytes long, and the serial monitor runs at 230400bps, this means we should be able to output 200 checkpoint messages per second, if we get the delay loop exactly right.

For those with a morbid interest in these things (or who would like to spot bugs for me), here is the checkpoint function in its entirety:

checkpoint:
; Routine to record the progress of code through the hypervisor for
; debugging problems in the hypervisor.
; If the JSR checkpoint is followed by $00, then a text string describing the
; checkpoint is inserted into the checkpoint log.
; Checkpoint data is recorded in the 2nd 16KB of colour RAM.

; Save all registers and CPU flags
sta checkpoint_a
stx checkpoint_x
sty checkpoint_y
stz checkpoint_z
php
pla
sta checkpoint_p

; pull PC return address from stack
; (JSR pushes return_address-1, so add one)
pla
clc
adc #$01
sta checkpoint_pcl
pla
adc #$00
sta checkpoint_pch

; Only do checkpoints visibly if switch 12 is set
lda $d6f1
and #$10
beq cp9

inc $d020

; Write checkpoint byte values out as hex into message template
ldx checkpoint_a
jsr checkpoint_bytetohex
sty msg_checkpoint_a+0
stx msg_checkpoint_a+1
ldx checkpoint_x
jsr checkpoint_bytetohex
sty msg_checkpoint_x+0
stx msg_checkpoint_x+1
ldx checkpoint_y
jsr checkpoint_bytetohex
sty msg_checkpoint_y+0
stx msg_checkpoint_y+1
ldx checkpoint_z
jsr checkpoint_bytetohex
sty msg_checkpoint_z+0
stx msg_checkpoint_z+1
ldx checkpoint_p
jsr checkpoint_bytetohex
sty msg_checkpoint_p+0
stx msg_checkpoint_p+1
ldx checkpoint_pch
jsr checkpoint_bytetohex
sty msg_checkpoint_pc+0
stx msg_checkpoint_pc+1
ldx checkpoint_pcl
jsr checkpoint_bytetohex
sty msg_checkpoint_pc+2
stx msg_checkpoint_pc+3

; Clear out checkpoint message
ldx #39
lda #$20
cp4: sta msg_checkpointmsg,x
dex
bpl cp4
cp9:
; Read next byte following the return address to see if it is $00,
; if so, then also store the $00-terminated text message that follows.
; e.g.:
; jsr checkpoint
; .text 0,"OPEN DIRECTORY",0
; to record a checkpoint with the string "OPEN DIRECTORY"
ldy #$00
lda (<checkpoint_pcl),y

bne nocheckpointmessage

; Copy null-terminated checkpoint string
ldx #$00
iny
cp3: lda (<checkpoint_pcl),y
beq endofcheckpointmessage
nop
sta msg_checkpointmsg,x
inx
iny
cpy #40
bne cp3

endofcheckpointmessage:
; Skip $00 at end of message
iny
nocheckpointmessage:

; Advance return address following any checkpoint message
tya
clc
adc checkpoint_pcl
sta checkpoint_pcl
lda checkpoint_pch
adc #$00
sta checkpoint_pch

; Only do checkpoints visibly if switch 12 is set
lda $d6f1
and #$10
beq checkpoint_return

; output checkpoint message to serial monitor
ldx #0
cp5: lda msg_checkpoint,x
sta hypervisor_write_char_to_serial_monitor
inx

; delay at least 2,000 cycles to allow character to be written
; each inner loop is 2 + 256 * (2+3) = ~1,250 cycles
; so 2 such loops should take long enough
ldy #2
ldz #0
cp6: inz
bne cp6
dey
bpl cp6

cmp #10
bne cp5
checkpoint_return:
; restore registers
lda checkpoint_p
php
lda checkpoint_a
ldx checkpoint_x
ldy checkpoint_y
ldz checkpoint_z
plp

; return by jumping to the 
jmp (checkpoint_pcl)

checkpoint_bytetohex:
txa
and #$f0
lsr
lsr
lsr
lsr
jsr checkpoint_nybltohex
tay
txa
and #$0f
jsr checkpoint_nybltohex
tax
rts
checkpoint_nybltohex:
and #$0f
ora #$30
cmp #$3a
bcs cpnth1
rts
cpnth1: adc #$06
rts

; checkpoint message
msg_checkpoint:      .byte "Checkpoint @ $"
msg_checkpoint_pc:    .byte "%%%% A:$"
msg_checkpoint_a:     .byte "%%, X:$"
msg_checkpoint_x:     .byte "%%, Y:$"
msg_checkpoint_y:     .byte "%%, Z:$"
msg_checkpoint_z:     .byte "%%, P:$"
msg_checkpoint_p:     .byte "%% :"
msg_checkpointmsg:    .byte "                                        "
     .byte 13,10  ; CR/LF
msg_checkpoint_eom:     

Monday, 7 December 2015

Is this the first academic slide presentation using an 8-bit computer since the 80's?

Who knows, but it was fun:


But my message is quite serious: By insulating new computer science and IT students from how computers really work, we may well be disadvantaging them, by preventing them from learning how a computer really works.  It's quite the same idea as starting a mechanic on a simple old car, instead of on a nuclear submarine: make the important details visible so that they can be learnt.

Thursday, 5 November 2015

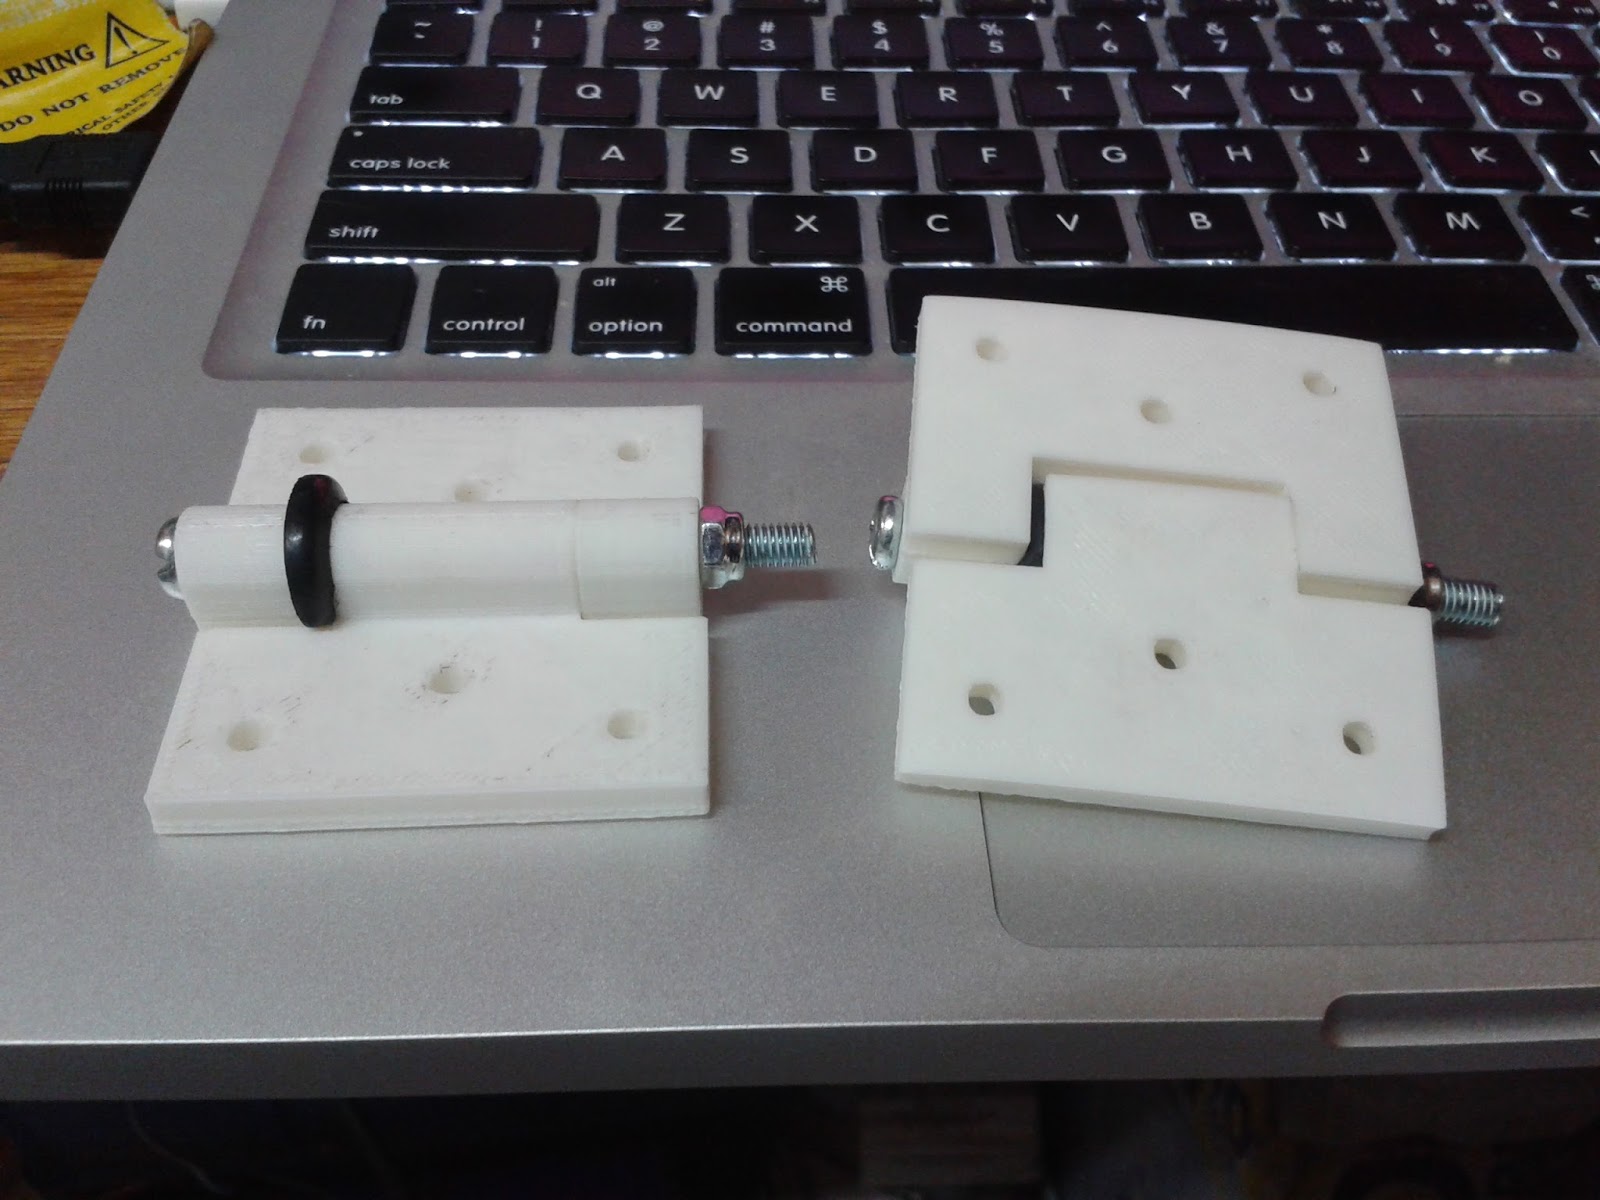
3D printing friction-hinges for the laptop prototype

I have been thinking for a while about what to use for hinges for the MEGA65 laptop prototype. The most important thing is that the hinges need to be friction hinges, like for all sensible laptops. A friction hinge is just a hinge that stays in the same position unless a certain amount of force is applied. For laptops, this means that the screen doesn't slump down under its own weight.  Laptops that have bad friction hinges are Not Fun At All To Use.  I don't want the MEGA65p prototype to be in that category, so I started looking for friction hinges.

First, I took apart an old mac book pro to see if the friction hinges were useful, but they are tiny, and their small size means that they realistically need a metal chasis to bolt to, in order to spread the forces. Not really an option for me.

Then I looked online at various commercial friction hinges, but they are about $60 a pair, and would take forever to get delivered.

So I searched for 3D-printable friction hinges and found a couple of different designs on thingiverse.com.  The one I ended up using is nice and simple, and just uses a rubber o-ring to provide the friction.  While the o-ring is likely to wear, it will be pretty easy to replace.


In the process, I also discovered that someone has made a passive digital(!!!) sundial. Yes, a sundial with a digital display, and that is still just a passive lump of stuff, even though it displays the time to the nearest twenty minutes in digital format inside the shadow of the gnomon (the normally pointy bit that makes the shadow on a sundial). I couldn't help myself, so I have one printing at the moment.

Photos of laptop prototype work

Last weekend was the Adelaide Maker Faire, so I had a stall with the MEGA65 running from a Nexys4 board, and me attempting to assemble some of the laptop prototype, with rather mixed success.

First, the prototype laptop will likely bear no resemblance to any future production laptop we might make.  It is a laptop for me personally to use, although others are free to replicate it.  In short, it will be rather big, and rather ugly and imperfect in various ways.

I am also in the middle of some other work, so apologies for the orientation and quality of these shots: I figured that people would still like to see what we have now.

Here we have the top-half with the screen fitted into using the bezels I made.  I measured some things incorrectly, in particular for holding the screen in from behind, so I will need to make some improvements there.  The oval hole is for cables to come out to connect into the bottom half until I come up with a better cable routing scheme for it at the back, but that still protects the cables. I will probably have to 3D print some pieces to do that.


Here we have the on-screen controls for the panel driver board. This will allow fiddling with video settings. I was quite nicely surprised that I managed to get all 9 holes correctly spaced!  The buttons are quite short, so you need finger nails or a pen to operate some of them.  I will probably design some 3D printed tops for them at some point to improve this.

You can also see the crenelation around the edges of the pieces here so that they fit together. I just used one of those laser-cut box designers.

Here you can see one corner of the bezel that spaces the screen back 12mm from the font, so that the real C65 keyboard won't touch the screen when it is shut.  I got this pretty close, but there were gaps of a couple of millimeters that I need to work out why they appeared. It is possible I put some pieces in the wrong places.


Here you can see inside.  The panel is held in on the top with entirely the wrong parts, because I really messed up the plans for those. I have now figured I can hold the screen in with two vertical pieces that will pass behind the full-height of the screen, and no get in the way of the inverter (right side on the bottom) or panel driver (left side on the bottom).  I also need to make a short VGA cable, because a 2m one won't fit in here with the FPGA board (yes, the "computer" part will be in the "screen", largely because I am using huge batteries :)


This is the rear of the back of the screen, with the screws holding the inverter and panel driver in. The other four holes are for the FPGA board. They also fit nicely. In fact, I didn't do too bad at all on the top-half for fitting. The bottom-half that has the floppy, keyboard and batteries is a different story altogether...

Here is the bottom and side panels of the bottom. The floppy drive fits great, but I made the hole for it on the right about 20mm too wide, so that needs fixing.  The expansion port, video and IEC serial ports and cassette ports on the back are all fine, too, as far as I can tell.  

The green pegs are wall plugs which was a nice idea I cam up with to make "pens" for each battery cell. However, I apparently measured them in the middle of the night when I was too tired, because the pens are about 10mm too narrow, and 10mm too short.  I can probably drill a few remedial holes and sort that out.

The joystick, power and reset button ports on the left side also fit nicely. However, the mag-safe connector hole turns out to be too close to the back, and doesn't leave enough room for the widget board, so I will need to drill a new 2mm hole in the bottom, and also cut a new side panel.  I don't mind redoing the side-panels because I have enough spare plastic for those little bits, but the full-size panels cost $10 - $20 each, depending on whether I can get nice cheap off-cuts from our local plastics shop, Menzel Plastics.


Here is the same panel upside-down, so you can see how the drive screws in. The drive also screws to the front-side panel.


And again from on the edge, showing the nice old SONY floppy drive I am using, and the wall-plugs in more detail.


Finally, here is the top side of the bottom case.  The two "inside" panels are "ivory" instead of "pearl" because I (incorrectly) thought that I would have to re-do those at some point, but that the outside panels would be fine.  I should have done it the other way around, given where all my measurement errors are.  Anyway, when I get some time, I will start fixing the problems, and progressively assembling the thing.